

introduction
The urban planning departments are increasingly adding digital deliveries to your workflow requirements -especially for 3D -Digital models (BIM). City planners, architects, engineers and stakeholders can simulate, analyze and visualize the infrastructure of a city by integrating these plans into real data before the physical construction begins. This enables better decision -making, improves cooperation between multidisciplinary teams and improves the overall efficiency and sustainability of urban development. This shift towards data -controlled, integrated urban planning changes the redesign of the growth of cities and ensures that they are more sustainable, livable and future -proof. With the increasing increase in the urban population, the use of BIM in urban planning will be of central importance in order to create cities that can effectively overcome new challenges.
Before you started
What you need
- ArcGIS notebook included in this post
- ArcGIS Pro 3.2 or higher
After several digital models have been combined as a single feature data record, you can now examine the result of the outer shell to determine whether it meets the requirements. The picture below shows that the outer shell layer for both buildings lack the roof and the lower floor and many unnecessary inner elements such as seats and pipes that negatively influence the performance.

Before you can repair the feature feature course from Exteriorshell, you must understand how the outer shell is created.
The creation of the outer shell depends on the data type (building, bridge, street, etc.) and data format. In this example, you will check the outer shell from a building with source data from Revit. For a standard building bowl, the Outteriorshell feature class is created by looking at the windows, doors, walls and floors (where the attribute function Is set to External). After these elements have been grouped, you will find the next functions in the generic model: columns (only the architecture), stairs and stair railings. As soon as all categories have been identified, the Exteriorshell feature class is created.
The outer shell shown above was created from a digital model that is the result of the combination of 46 different revIT files. Each digital component of the component has its own feature course class for external huts, all of which were attached to a single functional class by running the BIM file on geodatabase geocrocessing tool. Due to the different types of Revit files used, not all followed the behavior of the building bowl and instead brought attributes from the behavior of the Fallback shell.
In order to better understand the creation of the outer shell for different types of structures and formats, you can find in the following graphics.


The rules documented above were based on ARCGIS Pro 3.3.
After you understand how the outer shell is created, you can ask the modeler or designer to fix some of the problems you have discovered. In this case, the project has already been submitted, so that you have to repair the outer shell directly from the geodatabase instead.
Complete the following workflows to improve the outer shell of the building level, including manual workflow and automation with ArcPy.
Edit the Feate Feature course manually from outside
First, improve the External Feature class, so the representation of the building is more realistic.
- Optionally, create a copy of the external course class.
This is recommended so that you have a better control over the elements that are deleted and added to the feature class and if you have to return to the original Exteriorshell feature class.
- Open a local scene.
- Add the scene of the outer shell feature class.
Delete elements
Next, delete elements.
- Select the element.
- Delete the sound harm.

3. Delete the furniture.

4. Delete the heating pipes.

5. Delete the HLK system.

Add elements
The current outer shell feature class shows neither the roof nor the first floor or the elements on the ground floor.
- Add the Feate floors -Featature class.
- Navigate through the scene to get a better perspective.

3. Create a definition request based on the “Building level” attribute by selecting BLDGLEVEL And Contains the value (s)and check the 2Present 10And 8 Boxes.

V.

You can now attach these elements to the feature course of the outer shell.
5. Open the Appendix -Geocessing tool and set the following parameters:
A. for Enter the data recordchoose Floors.
B. for Target datachoose External.
C. for Field passchoose Use the field card to reconcile field differences.
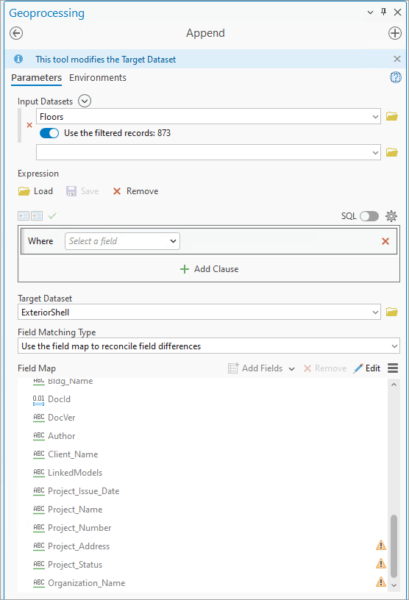
6. Click Click Run.
Exteriorshell's feature course now contains the soils added by the append Geoprocessing tool.

Automate the processing of the feature course from Exteriorshell
The following code shows the workflow to improve the Outteriorshell feature class, so the representation of the building is more realistic.
import arcpy

# Set the input geodatabase and workspace
input_gdb = r'C:\Projects\Jihlava_MultipurposeAreana_2025.gdb\Multi_Areana'
arcpy.env.workspace = input_gdb

# Define feature class and layer names
exteriorshell_fc = 'ExteriorShell_Multi_Areana'
floors_fc = 'Floors_Multi_Areana'
working_layer = "memory\\ExteriorShell_lyr"
working_floors_layer = "memory\\Floor_lyr"
temp_fc = "ExteriorShell_Temp"

# Delete existing temporary layer if it exists
if arcpy.Exists(working_layer):
    arcpy.Delete_management(working_layer)
# Create a feature layer for processing
arcpy.management.MakeFeatureLayer(exteriorshell_fc, working_layer)

filter_field = 'DocName'
filter_values = [
    '19_024_JIHL_I_ESI',
    '19_024_JIHL_I_INT',
    '19_024_JIHL_I_PODHLED_AKU',
    '19_024_JIHL_I_TRB',
    '19_024_JIHL_I_VZT',
    '19_024_JIHL_III_ESI',
    '19_024_JIHL_III_INT',
    '19_024_JIHL_III_UTCH',
    '19_024_JIHL_III_VZT'
]
# Build SQL WHERE clause to exclude these DocNames
where_clause = f"{filter_field} NOT IN ({', '.join([repr(name) for name in filter_values])})"
print(where_clause)

# Select features not in the excluded DocNames
arcpy.management.SelectLayerByAttribute(working_layer, "NEW_SELECTION", where_clause)

# Delete existing temp feature class if it exists
if arcpy.Exists(temp_fc):
    arcpy.Delete_management(temp_fc)

# Copy the selected features to a new feature class
arcpy.management.CopyFeatures(working_layer, temp_fc)

# Delete existing temporary floor layer if it exists
if arcpy.Exists(working_floors_layer):
    arcpy.Delete_management(working_floors_layer)
# Create a feature layer from the floors feature class
arcpy.management.MakeFeatureLayer(floors_fc, working_floors_layer)

filter_field = 'BldgLevel'
filter_values = [2, 8, 10]
# Build SQL WHERE clause to select these BldgLevels
floors_where_clause = f"{filter_field} IN ({', '.join([repr(name) for name in filter_values])})"
print(floors_where_clause)

# Select floor features based on the where clause and append to temp_fc
arcpy.management.SelectLayerByAttribute(working_floors_layer, "NEW_SELECTION", floors_where_clause)
arcpy.management.Append(inputs=working_floors_layer, target=temp_fc, schema_type="NO_TEST")

# Replace the original exterior shell feature class with the updated one
if arcpy.Exists(exteriorshell_fc):
    arcpy.Delete_management(exteriorshell_fc)
    arcpy.AddMessage('Exterior Shell Layer Deleted')
    arcpy.Rename_management(temp_fc, exteriorshell_fc)
    arcpy.AddMessage('Generalized Layer Renamed to Exterior Shell')
    arcpy.AlterAliasName(exteriorshell_fc, 'ExteriorShell')

# Optional cleanup of temporary layers
for lyr in [working_layer, working_floors_layer]:
    if arcpy.Exists(lyr):
        arcpy.Delete_management(lyr)
This automation code is specific to this project, but you can use it as an example to implement automation with your data.
Summary
After these steps, you can now automate an outer shell, improve and add more details. They can be used online in ArcGis Pro or on ArcGIS.
recognition
Many thanks to ArcData Prague, Sro and the city of Jihlava (Jihlava Rathaus) for sharing the digital models.
Download the ArcGIS notebook